Effective OkHttp
OkHttp was an invaluable library when developing the Android app for Khan Academy. While its default configuration offers significant utility, below are some steps we took for increasing the resourcefulness and introspective power of OkHttp:
1. Enable response caching on the filesystem
By default, OkHttp does not cache responses that permit caching by including such a HTTP Cache-Control header. Therefore your client may be wasting time and bandwidth by requesting the same resource again and again, as opposed to simply reading a cached copy after the initial response.
To enable caching of responses on the filesystem, configure a com.squareup.okhttp.Cache instance and pass it to the setCache method of your OkHttpClient instance. You must instantiate the Cache with a File representing a directory, and a maximum size in bytes. Responses that can be cached are written to the given directory. If the caching of a response causes the directory contents to exceed the given size, responses are evicted while adhering to a LRU policy.
As recommended by Jesse Wilson, we cache responses in a subdirectory of context.getCacheDir():
// Base directory recommended by http://stackoverflow.com/a/32752861/400717.
// Guard against null, which is possible according to
// https://groups.google.com/d/msg/android-developers/-694j87eXVU/YYs4b6kextwJ and
// http://stackoverflow.com/q/4441849/400717.
final @Nullable File baseDir = context.getCacheDir();
if (baseDir != null) {
  final File cacheDir = new File(baseDir, "HttpResponseCache");
  okHttpClient.setCache(new Cache(cacheDir, HTTP_RESPONSE_DISK_CACHE_MAX_SIZE));
}
In the Khan Academy application, we specify HTTP_RESPONSE_DISK_CACHE_MAX_SIZE as 10 * 1024 * 1024, or 10 MB.
2. Integrate with Stetho
Stetho is a lovely library by Facebook that allows you to inspect your Android application using the Chrome Developer Tools feature of Chrome.
In addition to allowing you to inspect the SQLite databases and view hierarchies of your application, Stetho allows you to inspect each request and response made by OkHttp:
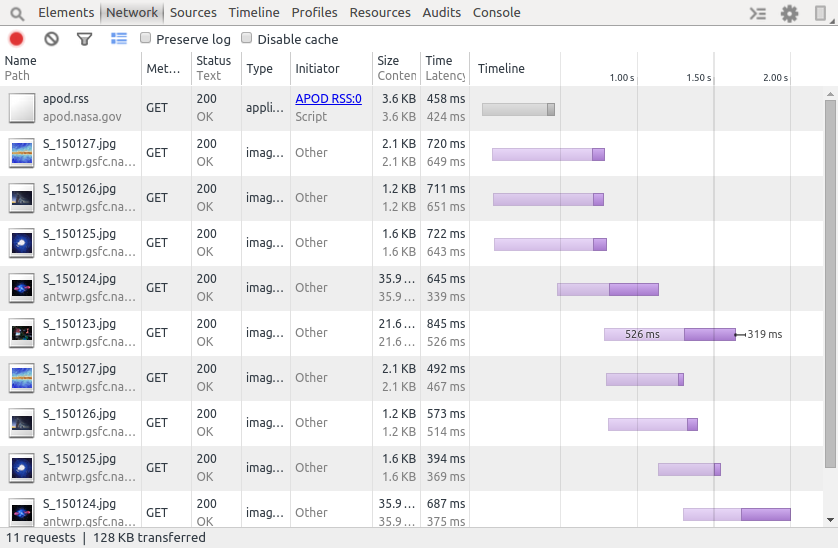
This introspection is very useful for ensuring that the server is returning the HTTP headers that permit caching of resources, as well as verifying that no requests are made when cached resources should exist.
To enable Stetho, simply add a StethoInterceptor instance to the list of network interceptors:
okHttpClient.networkInterceptors().add(new StethoInterceptor());
Then, after running your application, open Chrome and navigate to chrome://inspect. The device and application identifier of the application should be listed. Visit its “inspect” link to open the Developer Tools, and then open the Network tab to begin monitoring requests by OkHttp.
3. Use your client with Picasso and Retrofit
If you are like us, you might use Picasso to load images over the network, or use Retrofit to simplify issuing requests and decoding responses. By default, these libraries will implicitly create their own OkHttpClient for internal use if you do not explicitly specify one. From the OkHttpDownloader class of version 2.5.2 of Picasso:
private static OkHttpClient defaultOkHttpClient() {
  OkHttpClient client = new OkHttpClient();
  client.setConnectTimeout(Utils.DEFAULT_CONNECT_TIMEOUT_MILLIS, TimeUnit.MILLISECONDS);
  client.setReadTimeout(Utils.DEFAULT_READ_TIMEOUT_MILLIS, TimeUnit.MILLISECONDS);
  client.setWriteTimeout(Utils.DEFAULT_WRITE_TIMEOUT_MILLIS, TimeUnit.MILLISECONDS);
  return client;
}
Retrofit has a similar factory method for creating its own OkHttpClient.
Images are some of the largest resources that your application will load. While Picasso maintains its own LRU cache for images, it is strictly in-memory. If the client attempts to load an image using Picasso, and Picasso does not find that image in its in-memory cache, then it will delegate loading that image to its internal OkHttpClient instance. And by default that instance will always load the image from the server, as the defaultOkHttpClient method above does not configure it with a response cache on the filesystem.
Specifying your own OkHttpClient instance allows for returning a cached response from the filesystem. No image is loaded from the server. This is especially important after the app is first launched. At this time Picasso’s in-memory cache is cold, and so it will delegate loading images to the OkHttpClient instance frequently.
This requires building a Picasso instance that is configured with your OkHttpClient. If you are loading images by using Picasso.with(context).load(...) in your code, then you are using the Picasso singleton instance, which is lazily instantiated and configured with its own OkHttpClient by method with. Therefore we must assign our own Picasso instance as the singleton before the first call to with.
To do this, simply wrap the OkHttpClient instance in an OkHttpDownloader, and pass that to the downloader method of your Picasso.Builder instance:
final Picasso picasso = new Picasso.Builder(context)
    .downloader(new OkHttpDownloader(okHttpClient))
    .build();

// The client should inject this instance whenever it is needed, but replace the singleton
// instance just in case.
Picasso.setSingletonInstance(picasso);
To use your OkHttpClient instance with a RestAdapter in Retrofit 1.9.x, wrap the OkHttpClient in an OkClient instance, and pass that to the setClient method of your RestAdapter.Builder instance:
restAdapterBuilder.setClient(new OkClient(httpClient));
In Retrofit 2.0, simply pass the OkHttpClient instance to the client method of your Retrofit.Builder instance.
In the Khan Academy application, we leverage Dagger to ensure that we have only one OkHttpClient instance, and that it is used by both Picasso and Retrofit. We create a provider for the OkHttpClient instance with the @Singleton annotation:
@Provides
@Singleton
public OkHttpClient okHttpClient(final Context context, ...) {
  final OkHttpClient okHttpClient = new OkHttpClient();
  configureClient(okHttpClient, ...);
  return okHttpClient;
}
This OkHttpClient is then injected with Dagger into the other providers that create our RestAdapter and Picasso instances.
4. Specify a user agent interceptor
Log files and analytics are much more informative when clients provide a detailed User-Agent header value in every request. By default, OkHttp includes a User-Agent value that specifies only the version of OkHttp. To specify your own user agent, first create an interceptor that replaces the value, following this suggestion on StackOverflow:
public final class UserAgentInterceptor implements Interceptor {
  private static final String USER_AGENT_HEADER_NAME = "User-Agent";
  private final String userAgentHeaderValue;

  public UserAgentInterceptor(String userAgentHeaderValue) {
    this.userAgentHeaderValue = Preconditions.checkNotNull(userAgentHeaderValue);
  }

  @Override
  public Response intercept(Chain chain) throws IOException {
    final Request originalRequest = chain.request();
    final Request requestWithUserAgent = originalRequest.newBuilder()
        .removeHeader(USER_AGENT_HEADER_NAME)
        .addHeader(USER_AGENT_HEADER_NAME, userAgentHeaderValue)
        .build();
    return chain.proceed(requestWithUserAgent);
  }
}
To construct the User-Agent header value that is passed into the constructor of UserAgentInterceptor, use whatever values you would find informative. We use:
- an
osvalue ofAndroidto clearly communicate that this is an Android device Build.MODEL, or the “end-user-visible name for the end product”Build.BRAND, or the “consumer-visible brand with which the product/hardware will be associated”Build.VERSION.SDK_INT, or the “user-visible SDK version of the [Android] framework”BuildConfig.APPLICATION_IDBuildConfig.VERSION_NAMEBuildConfig.VERSION_CODE
The last three values are specified by the applicationId, versionCode, and versionName values in our Gradle build script. For more information, consult the documents on versioning your applications, and on configuring your applicationId with Gradle.
Note that if your application uses a WebView, you can configure it to use the same User-Agent header value that you constructed the UserAgentInterceptor with:
WebSettings settings = webView.getSettings();
settings.setUserAgentString(userAgentHeaderValue);
5. Specify reasonable timeouts
Before version 2.5.0, OkHttp requests defaulted to never timing out. Starting with version 2.5.0, a request times out if establishing a connection, reading the next byte from a connection, or writing the next byte to a connection takes more than 10 seconds to complete. Doing nothing more than updating to version 2.5.0 revealed bugs in our own code, simply because we began exercising certain error paths for the first time. To override these default values, invoke setConnectTimeout, setReadTimeout or setWriteTimeout respectively.
Note that Picasso and Retrofit specify different timeout values for their default OkHttpClient instances. By default, Picasso specifies:
- A connect timeout of 15 seconds.
- A read timeout of 20 seconds.
- A write timeout of 20 seconds.
Whereas Retrofit specifies:
- A connect timeout of 15 seconds.
- A read timeout of 20 seconds.
- No write timeout.
By configuring Picasso and Retrofit with your own OkHttpClient instance, you can ensure consistent timeouts by all requests.
Conclusion
Again, the default configuration of OkHttp offers significant utility. By adopting the steps above, you can increase its resourcefulness and introspective power, and improve the quality of your application.
comments powered by Disqus